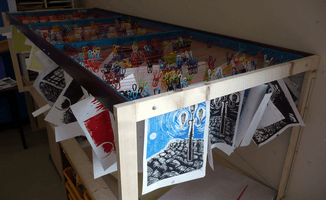
When people are making lots of art, they need a quick and convenient place to store their work. Especially if it is wet.
Here is the first stage of the drying rack I made for my art room.
It sits on top of my desk (which I really never use) and a rolling storage caddy.
A commercial drying rack would cost about $2000 for the same capacity. I made this for about $120. It is freestanding because Citadel High School is a beautiful building and I certainly did not want to modify or damage the walls.
Some additional notes:
- The lumber for the frame is plain old construction SPF. I take 2x4s and joint and plane them to look nicer. For the ribs of the rack itself, I resawed 2x4s before jointing and planing.
- Strength of the racks is important. I used biscuit joints to make the corners of the squares.
- I predrilled the holes for the string before assembling the squares. I also made a thin dado over the holes so that the string had room to travel.
- To save money, I used poly cord from Dollarama to act as the lines. All the string cost $1.25. I used a plastic cord so that I would not have to worry about slackening over time, like cotton does. However, it slackened anyway, and I will have to replace it with something else, like nylon.
- I also used plastic-coated clips. This was the most expensive part. I have made drying racks before and used clothespins. But the clothespins would break after a while. I want this to last the rest of my career, so I spent a little more money to buy unbreakable clips. They cost about $1.50 for two lines worth. I put 5 clips on each line, for convenience.
- I varnished the permanent parts of the rack with several coats of a paint/varnish mix for protection. Raw wood won't last long in an art room.
- The sides and bottom are temporary and made of raw lumber. I have more plans for this yet! Right now I find that the rack is too low. But wait for the next round of improvements!
